In case you missed my feature at ucreate crafts, I've posted the full tutorial here for you today!
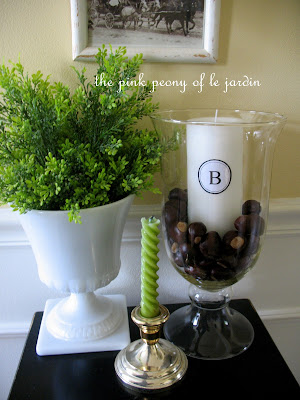
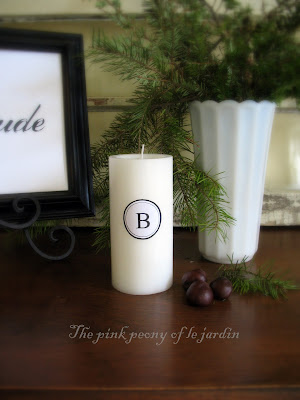
Monogrammed Candles
(Perfect to diplay in your home, your friends' homes, and to give to your children's teachers!)
More photos to follow the tutorial!
Materials:
mod podge
paintbrush
paintbrush
candle* (my small one is from dollar tree!)
2 different size black sharpies*
2 different size lids*
1 piece of cardstock
pencil
pencil
This project takes very little time to do, but I have included every single step!
1. In Microsoft Word, type the letter that you want to use as your monogram. I use basic Times New Roman font with a font size of 72. (make sure it has sufficient space around it~at least a couple of inches all around). In other words, don't put it too close to the edge of the paper.
2. Print it on regular computer paper
3. Find two small lids or circles to trace around (one just a little smaller than the other) *I used a McCormick brand cream of tartar lid and the bottom of a prescription pill bottle.
4.Trace around one of the lids onto cardstock or a heavy paper.
3. Find two small lids or circles to trace around (one just a little smaller than the other) *I used a McCormick brand cream of tartar lid and the bottom of a prescription pill bottle.
4.Trace around one of the lids onto cardstock or a heavy paper.
5. Cut out a square about 1/2 " around the circle (doesn't need to be perfect)
6. Using sharp scissors, carefully cut out the circle.
7. Do the exact same thing with the next lid/circle.
8. Place and center the smaller "pattern" that you just made around the letter. * For this next part I used a black marker that has two ends. One end has a thinner point, the other end has a thicker point. First, use your black marker with the thinner point to trace around the inside of your pattern.
9. Next, center the bigger pattern evenly around the first circle that you made. Trace around it with a thicker black sharpie.
10. Cut it out.
11. With a paintbrush "paint" a thin layer of mod podge in the center of the candle.
12. Center your monogram over the mod podge, and smooth it out from the center of the letter, pressing out any air bubbles.
.13. Let dry and wrap as a gift or display in your home!
Gift idea:
Put in a small brown gift bag and tie a holiday ribbon and tag to the handles, or sew a little burlap bag to put your gift in, and then tie it with holiday ribbon and a tag. You can print more than one on a page for multiple gifts. Just leave enough space around them to cut your square.
Ideas to display in your home:
Leave your candle up all year and decorate around it for the holidays! I will use chestnuts, pinecones and greenery for Thanksgiving. Shiny dark red ball ornaments for Christmas would look beautiful also. Another idea is to spell out the word "noel" or "joy" with three or four small white dollar tree candles! *My small candle came from dollar tree~it was lavendar and lilac~but you can't tell. The large one was only a couple dollars from the Christmas Tree Store. There are so many possiblities!
I'm linking to
coastal charm
hooked on houses
centsational girl
the shabby nest
craft o maniac
cottage instincts
hope studios
These Creative Juices
A Stroll Thru Life
Sugar Bee-Craft Edition


(1).jpg)


GREAT idea! They look so expensive too. I'll definitely have to give it a try. Happy holidays :)
ReplyDeleteThis is such a great way to personalize a gift, thanks for the idea!
ReplyDeleteLovely idea!!!
ReplyDeleteThis is a terrific idea.. thank you so much for the detailed tutorial for accomplishing this.
ReplyDeleteYour's looks so professional~! I hope I can do half as well..
Happy Thanksgiving
Those look wonderful {and easy ~ a terrific combo!}. Thanks for the how to!
ReplyDeleteWonderful idea! You've done a beautiful job displaying them! Thanks for sharing and Happy Thanksgiving!
ReplyDelete~Holly
Love this! Did you know that you can create the circles in Word, under "Auto Shapes" & then "Format Auto Shapes" & then insert a text box for the letter. It would save the drawing the circles & worrying about keeping a steady hand!
ReplyDeleteWow!
ReplyDeleteThanks Kim!~ I had no idea!
Those look great!
ReplyDeletewww.uvinyl.com
www.uvinyl.blogspot.com
I love this! thanks for sharing!!!
ReplyDeleteReally cute and creative-who doesn't love a monogram! I'm your newest follower!
ReplyDeleteMagnifique! How simple and gorgeous! I found you through The Shabby Nest! Your blog is lovely!
ReplyDeleteThe candles turned out great!
ReplyDeleteeasy tute thanks!
ReplyDeleteThese are great!
ReplyDeleteAnother great project (and milk glass)!! :)
ReplyDeleteGreat idea to personalize the candles. Thanks so much.
ReplyDeleteWow, I love this! I might be able to squeeze it in yet this year. :)
ReplyDeleteI'm sooooo going to try this...thanks for sharing!
ReplyDeleteBlessings,
Linda
This is a project that I'd like to try! Thanks for the tute! I love decor with letters and numbers.
ReplyDeleteHappy Holidays!
Michelle
Love this idea~ what a sweet gift these would make! :)
ReplyDeletevery cute
ReplyDeleteCan you actually burn these candles? Just wondering if the candle will melt safely near the monogram.
ReplyDelete